



Full Body Harness with Quick Connect Buckles for Worksite Fit
A quick-connect buckle can make fastening easier, but it cannot correct a poor fit. When choosing a full body harness with quick connect buckles, check fit, adjustment, product markings, and compatibility with the planned fall-protection system. For worksite use, make sure the harness sits securely before using the connected system.
Buckle design is worth considering, but it is only part of the comparison. Strap adjustment, fit, standards markings, and compatibility with your self-retracting lifeline (SRL) also matter.
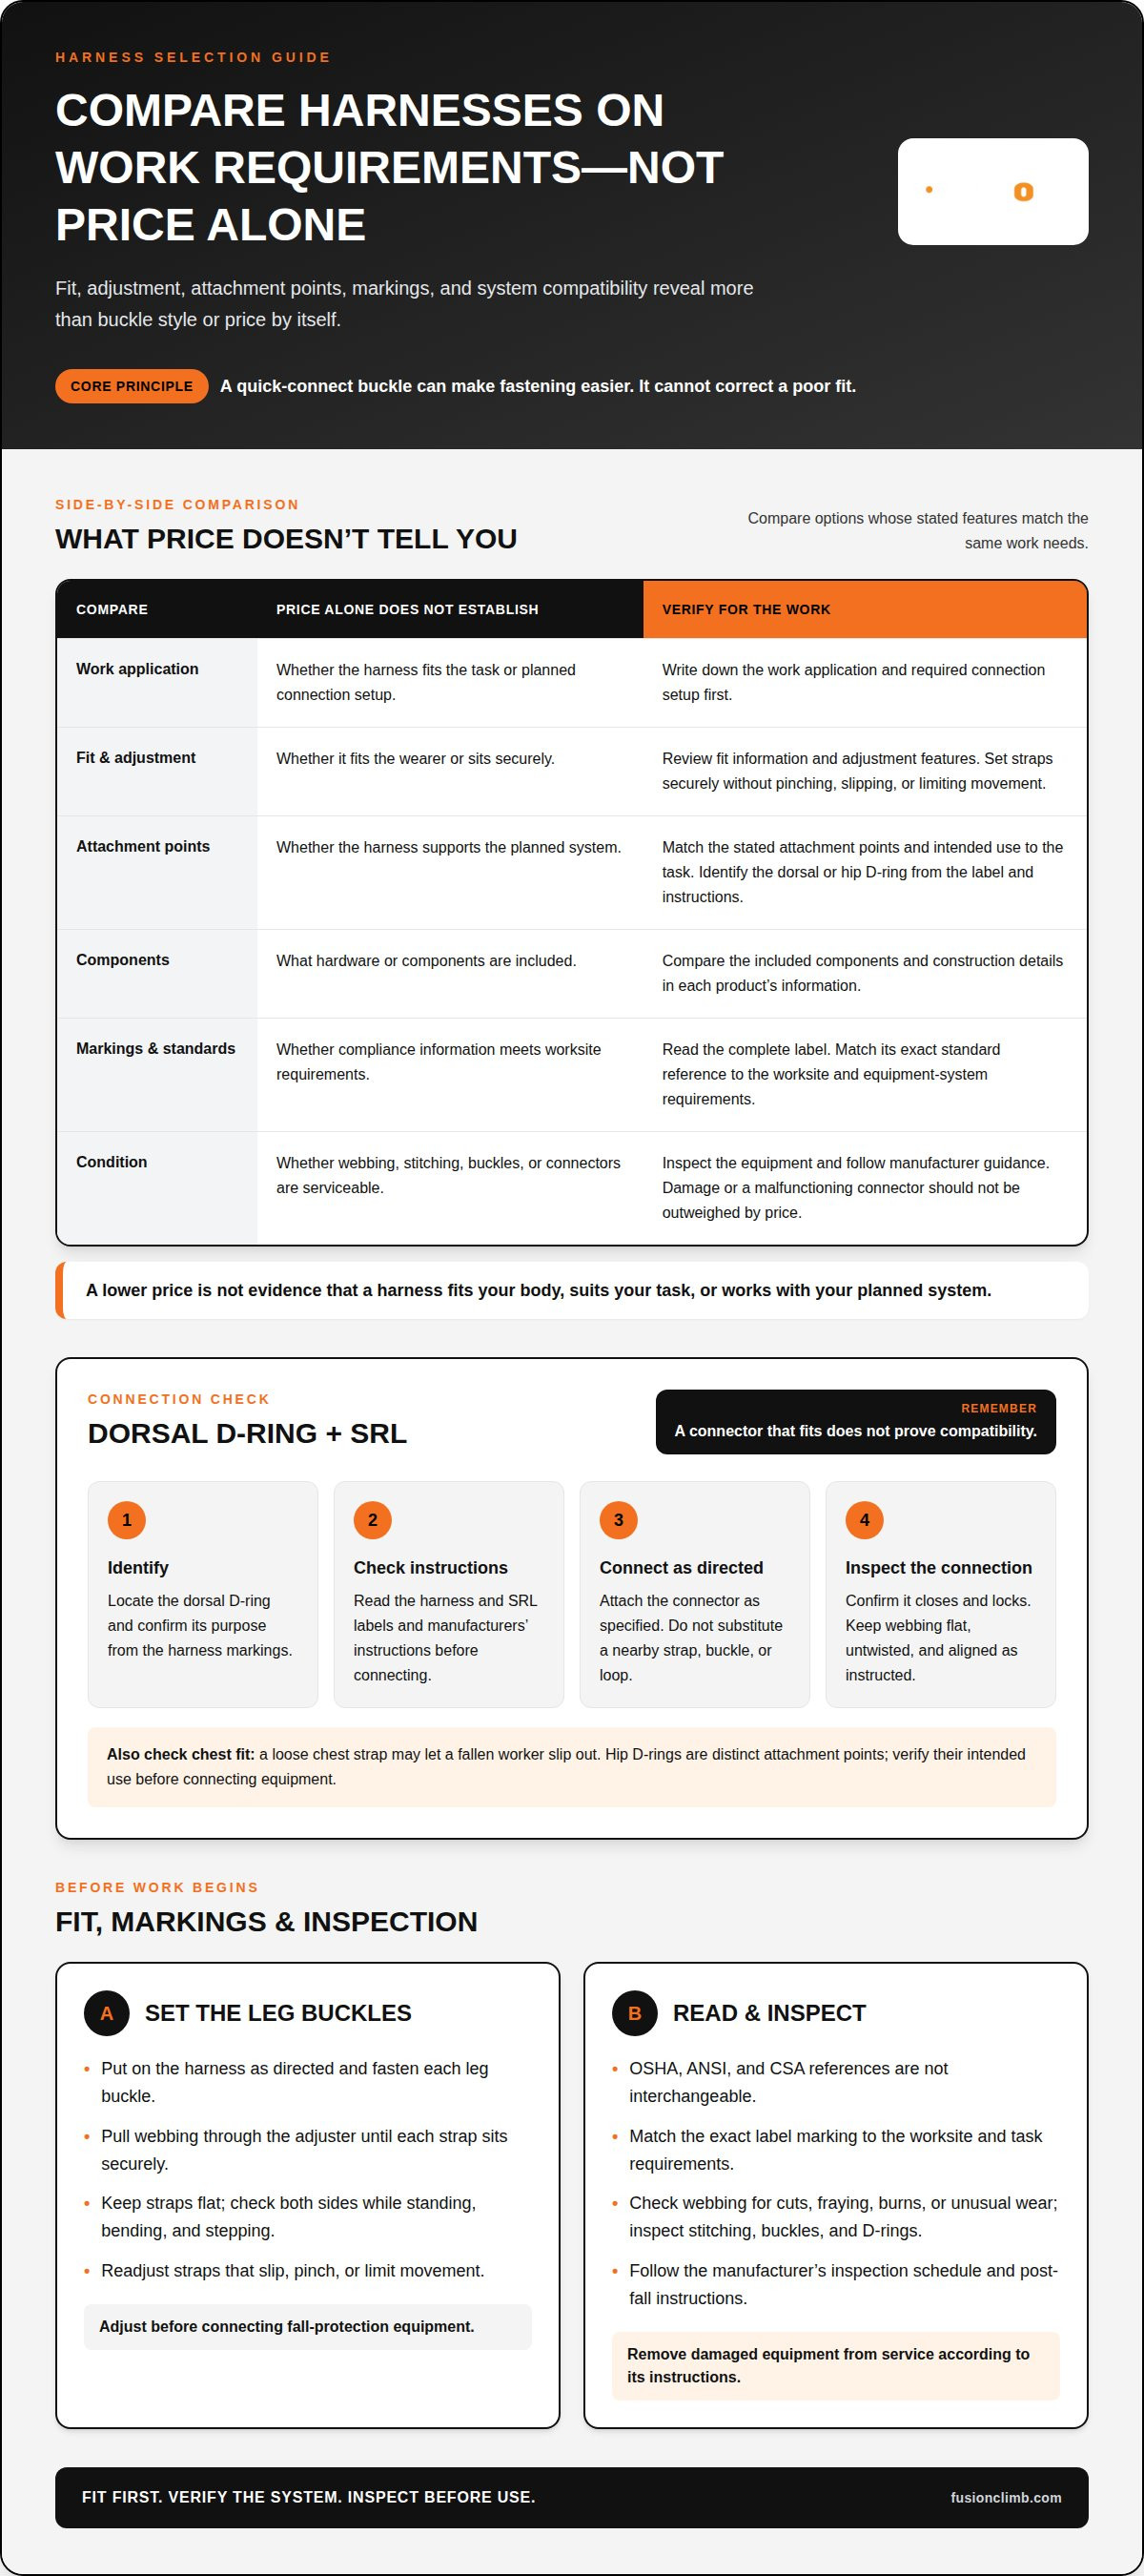
This guide shows how to compare harnesses without treating price as proof of suitability, review OSHA, ANSI, and CSA compliance information, adjust quick-connect leg buckles, and connect an SRL to a dorsal D-ring. Use these checks to assess fit and equipment details before work begins.
Key Takeaways
- Compare harnesses by fit, adjustment range, and connection needs, not by buckle style alone.
- Read compliance markings in the context of the worksite and the applicable requirements.
- Set the leg buckles so the harness sits securely without restricting movement.
- Review how the SRL connects to the dorsal D-ring and how the full system works together.
Dorsal D-rings and SRL attachment
First, identify the dorsal D-ring on the back of the harness. It is commonly used as an attachment point for a self-retracting lifeline, or SRL. Before connecting equipment, read the product labels and manufacturers’ instructions. Confirm that the SRL is intended for the harness and planned system. A connector that fits does not, by itself, establish compatibility.
To connect an SRL, inspect the harness D-ring and SRL connector, then attach the connector as directed. Confirm that it closes and locks, and that the SRL does not twist the webbing. Keep the connection aligned as specified in the equipment instructions. Do not attach it to a nearby strap, buckle, or loop just because it is easier to reach. MDPI notes that a loose chest strap may let a fallen worker slip out and fall to the ground, so include chest fit in your pre-use check.
- Locate the dorsal D-ring and confirm its purpose from the harness markings.
- Check the SRL label and connector instructions before connecting.
- Close the connector fully and inspect the connection before work.
- Route straps flat, without twists or trapped webbing.
A lanyard clip also needs to connect to the correct point. Follow its instructions and the harness markings; do not assume every clip belongs on the dorsal D-ring. For example, do not move a connector intended for a designated attachment point to a belt loop. After clipping in, check that the gate is closed and the connector is not resting against a buckle or strap edge.
Hip D-rings are distinct attachment points, not substitutes for the dorsal ring. Check the harness label and instructions to identify their intended use before connecting a lanyard or other equipment. Match the attachment point to the task, then check that the hardware moves freely without pulling the webbing out of position. If the setup changes, repeat the inspection before continuing.
Harness prices
A poorly fitted harness can shift, leaving straps out of position. MDPI notes that a loose chest strap may allow a fallen worker to slip out. Webbing or connector damage can also affect equipment function, so inspect both before use.
Compare prices only after confirming that the harnesses meet the same work requirements. Start with the label, fit range, adjustment and attachment points, and included components. For example, a harness with a dorsal D-ring and one with different attachment points are not identical options. The listed features show what each model is designed to support.
Quick-connect buckles are one feature, not a complete measure of value. Check how the leg straps adjust, whether the harness fits the wearer, and whether its attachment points suit the planned system. Then compare the construction details in the product information. A lower price does not show that a harness fits your task or body.
- Match attachment points and intended use.
- Compare adjustment features and fit information.
- Review which components come with each harness.
Use the same comparison process for each option. Write down the work application and required connection setup. Compare harnesses whose stated features match those needs, then review the instructions and inspect the equipment before use. Frayed webbing, damaged stitching, or a malfunctioning connector are reasons not to make price the deciding factor.
For a practical comparison, note each harness’s buckles, adjustment method, attachment points, and included hardware in one place. This makes differences visible without relying on price alone. You can also explore harness configurations as you narrow options to the fit and connection needs of your worksite.
OSHA, ANSI, and CSA compliance
Inspect the harness before each use and follow the manufacturer’s inspection schedule. Remove it from service if you find damage or the manufacturer’s instructions require it. There is no single replacement interval for every harness; base the decision on its condition and the manufacturer’s guidance.
OSHA, ANSI, and CSA references are not interchangeable. Start with the harness label and note the exact standard or compliance statement shown. Compare that marking with your worksite and equipment-system requirements. A quick-connect buckle does not establish compliance on its own.
Review the documentation in order. Match the harness model and marking to its instructions, then confirm that the stated standard applies to the country and task. Finally, check the instructions for compatible components, adjustment, inspection, and use. A standard named on a label should be read alongside the full manufacturer documentation, not used in its place.
- Read the complete label, including its standard reference.
- Match the named standard to your worksite requirements.
- Keep the harness instructions with the inspection process.
- Remove damaged equipment from use according to its instructions.
For a practical inspection, look for cuts, fraying, burns, or unusual wear on the webbing. Check the stitching, buckles, and D-rings for visible damage or malfunction. Make sure labels are readable so you can identify the equipment’s stated specifications. If the harness has been involved in a fall, follow the manufacturer’s post-event instructions before considering further use.
Decisions about replacement depend on the harness’s condition and the manufacturer’s criteria, not appearance alone. A harness may look serviceable even if a buckle does not work correctly, so test each quick-connect buckle as instructed. Record inspection results according to your worksite process. Those records can help identify recurring wear and show when equipment needs to be removed from service.
Quick-connect leg buckles and adjustments
A secure fit depends on correct strap adjustment, buckle closure, and following the harness instructions. Make adjustments before connecting fall-protection equipment.
Leg Buckle Adjustments
Put on the harness as directed, then fasten each leg buckle. Pull the webbing through the adjuster until each leg strap sits securely. Keep the straps flat, without twists or folds. Check that both sides feel even while standing, bending, and taking a step. Readjust any strap that slips, pinches, or limits movement.
Weight limits and fit ranges vary by harness model. Use the product label and manufacturer’s instructions to match the stated range and fit guidance to the wearer and work clothing.
Quick-Connect and Tongue Buckle Comparison
Quick-connect buckles fasten through a buckle mechanism; tongue buckles fasten through a selected opening. Neither design alone indicates which harness is safer. Compare the model’s instructions, fit, buckle condition, and secure closure. Choose an adjustment system the wearer can fasten correctly and inspect consistently.
Before each use, inspect the webbing and every quick-connect buckle. Look for cuts, fraying, damaged stitching, cracks, or parts that fail to engage. Fasten and release each buckle as instructed. Stop using it if it will not close or hold securely.
Use this short check before work:
- Confirm each leg strap is flat and adjusted evenly.
- Check buckle components for visible wear or damage.
- Fasten each buckle and confirm full engagement.
- Move through a few work motions, then check for strap slippage.
For model-specific fit and adjustment guidance, explore full-body harness options and follow the instructions supplied with the selected harness.
The Full Body Harness listing describes 5-point adjustment. Treat these as model-specific details: check the harness instructions to confirm the adjustment points and ring configuration, and ensure the leg straps remain secure and allow movement after adjustment.
Fusion Climb: Full Body Harnesses
Fusion Climb offers Full Body Harnesses for readers comparing harness options for worksite fit and fall-protection setups. Review each harness’s markings, instructions, adjustment method, and attachment points against the task and wearer before selecting equipment. A secure fit and compatible components matter more than buckle style alone.
For aerial adventure applications, Fusion Climb offers Superman Style Harnesses, Zipline Pulleys, and lanyards and tethers. Each product type serves a different equipment need, so match it to the intended activity and system. Use the guidance in this article to compare fit, buckle adjustment, and appropriate connections.
Explore Fusion Climb’s offerings at fusionclimb.com or contact the company with your equipment questions.
Make Fit Part of the Workday
Make harness selection part of a consistent worksite routine. A full body harness with quick connect buckles is one part of the system; users also need a clear process for checking fit, identifying equipment, and following the relevant instructions. Build these checks into shift preparation so buckle adjustment is not rushed at height.
Keep the process practical: allow each worker time to put on and adjust their assigned equipment, then complete the required checks before work starts. For contractors performing elevated maintenance and leak diagnosis, such as Hop To It Roof Repairs, these pre-work checks ensure fall-arrest gear functions seamlessly on steep pitches. If the work setup changes, pause and reassess whether the equipment still suits the task. Consistent preparation helps teams act deliberately rather than rely on memory under pressure.
For your next equipment decision, connect the harness requirements to the actual work and wearer. Contact Fusion Climb for harness help, then move forward with a fit and setup that supports the work ahead.
Frequently Asked Questions
What is a full-body harness with quick-connect buckles?
A full body harness with quick connect buckles is wearable fall-protection equipment with straps that secure around the torso and legs. Its quick-connect buckles fasten the straps without threading a tongue through an opening. The harness also has designated attachment points, whose locations and purposes depend on its design. Check the label and instructions to identify the correct points for the intended setup.
Which safety standards apply to full-body fall-arrest harnesses in the United States?
Start with the OSHA requirements relevant to the work and the standard markings on the specific harness. Fusion Climb’s product information lists ANSI Z359.11-2021 among its standards; confirm that the marking applies to the exact model being considered. A CSA marking should not be treated as a substitute for identifying applicable U.S. requirements. Read the product documentation alongside the worksite’s fall-protection procedures.
How much do full-body harnesses with quick-connect buckles cost?
Cost varies with harness design, intended use, adjustment features, and optional components. Compare models for the same work requirements and review what each configuration includes. A harness with different attachment points or padding, for example, may not be directly comparable to a simpler configuration. Prioritize suitability, fit, and documented specifications, then review the current product listing for the configuration you need.
How do you properly put on and adjust a full-body harness with quick-connect buckles?
Follow the harness instructions, especially if the model has a specific donning sequence. Lay it out and separate the shoulder, chest, and leg straps before putting it on. Fasten the buckles as directed, then adjust each strap while wearing the clothing and work gear planned for the task. Move as the worksite requires and readjust any strap that shifts or restricts movement.