



Zipline Connection Lanyards: How to Choose the Right Setup
What if the shortest link in a zipline setup determines whether the connection works as intended? Zipline connection lanyards do more than bridge a harness and trolley: their length, attachment style, and connector compatibility need to suit the complete system. Choosing one by appearance alone leaves important fit questions unanswered.
When comparing webbing and rope, or adjustable and fixed configurations, focus on how the lanyard interfaces with the harness, trolley, and other specified components. No single feature determines whether a lanyard is suitable.
This guide explains the lanyard’s role in the harness-to-trolley connection and outlines practical criteria for comparing construction, length, attachment points, and connectors. You’ll also learn how to assess a setup against its documentation. Fusion Climb’s lanyard range includes adjustable positioning options and configurations with construction details such as reinforced stitching and abrasion-resistant materials. Use the product specifications to compare those details with your system requirements.
Key Takeaways
- Zipline connection lanyards link a harness to a trolley, but their suitability depends on how they fit the complete system.
- Compare rope and webbing by documented specifications and application, not appearance or assumptions about which material is better.
- Check how sewn loops, girth-hitch configurations, and connectors interface with the harness and trolley.
- Start selection with the application and system documentation, then identify the required attachment points and lanyard configuration.
- Adjustable, sewn-loop, and energy-absorbing designs are distinct options. Match each to its documented intended use.
What Does a Zipline Connection Lanyard Do in the System?
A zipline connection lanyard links a user’s harness to the trolley assembly. It provides a defined connection path, but it is only one part of the setup. The harness supports the user, the trolley interfaces with the zipline cable, and compatible connectors join components where the design calls for them. Braking equipment has a separate role in controlling the rider’s stop.
Keep those functions distinct. A lanyard’s material or appearance alone doesn’t establish that it suits a particular harness and trolley. Suitability depends on compatibility across the full system and following the manufacturers’ instructions for each component.
How Does a Lanyard Connect a Harness to a Trolley?
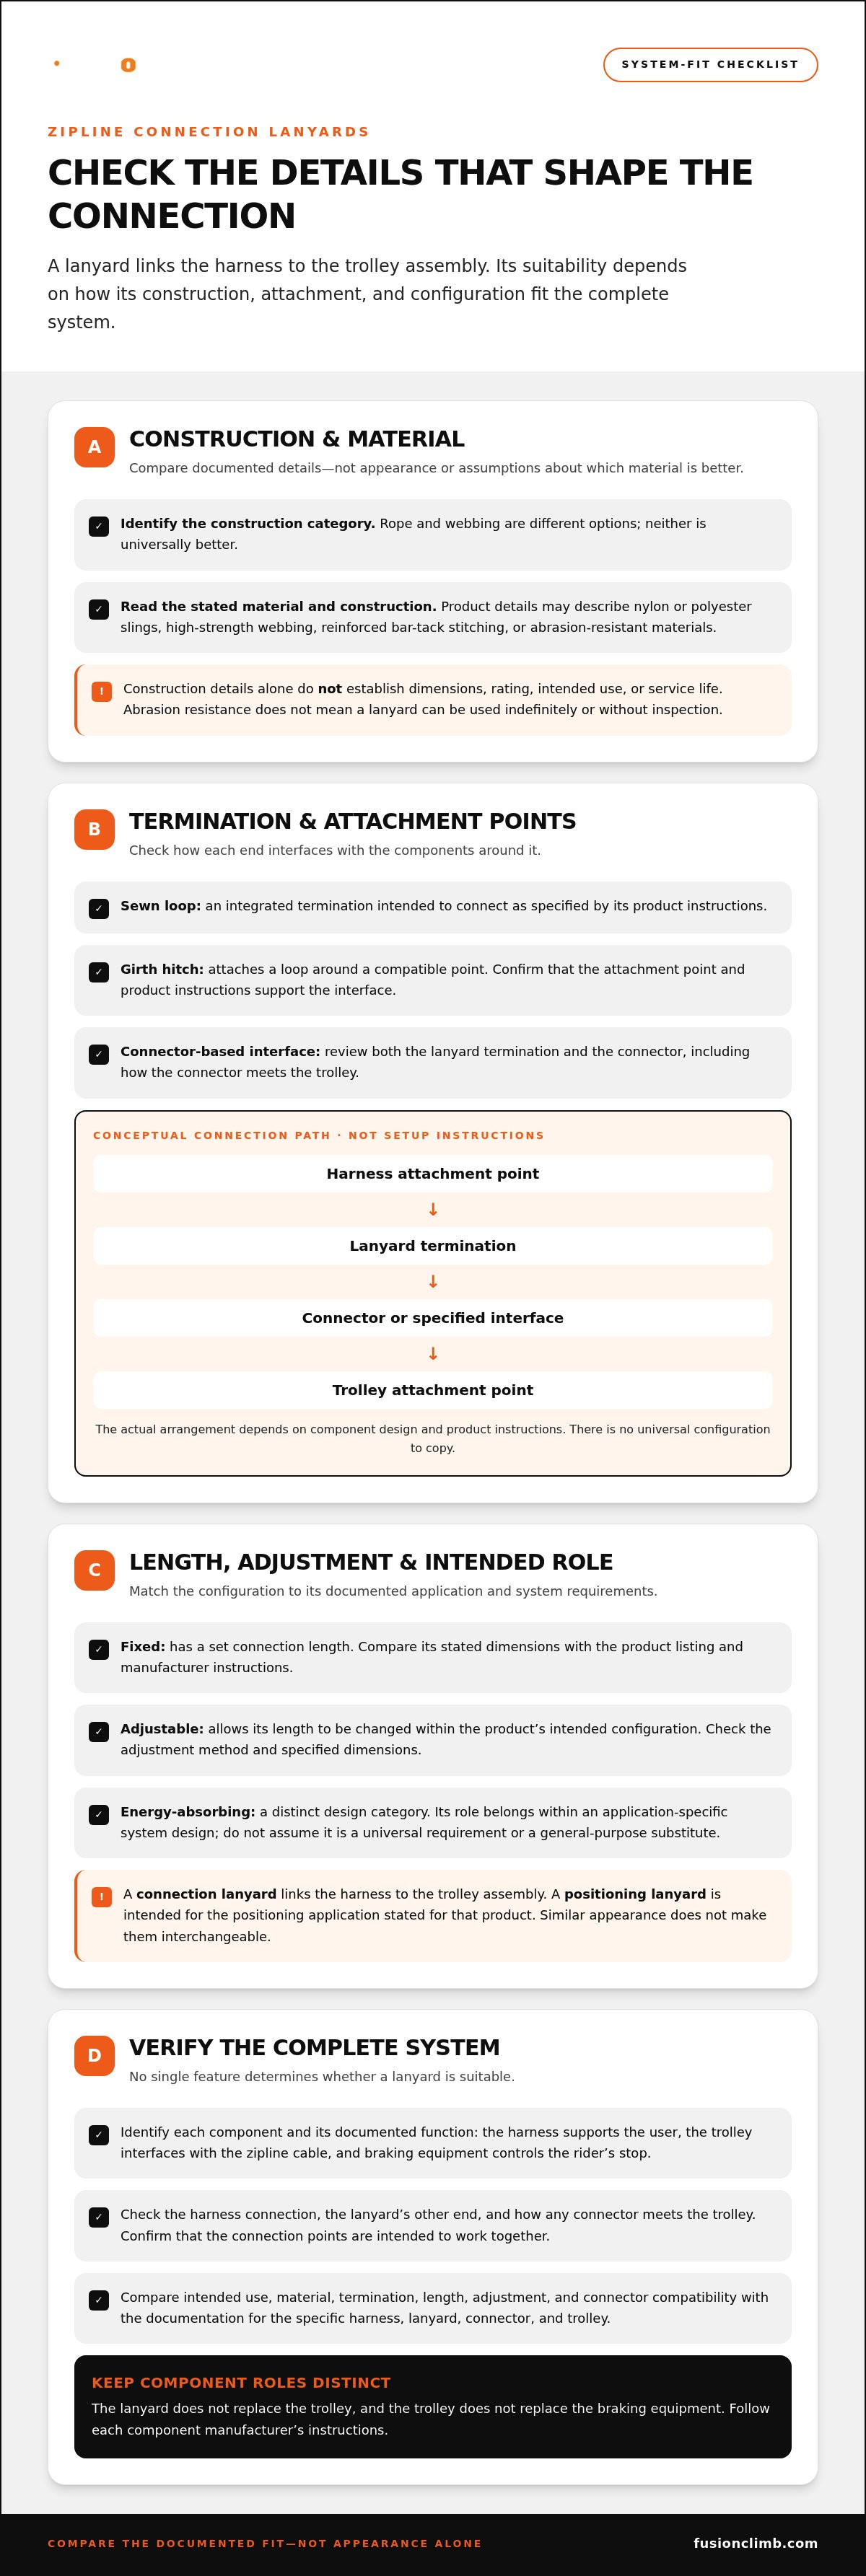
Check each interface in turn: where the lanyard meets the harness, how its other end connects, and how that connector meets the trolley. Depending on component design and product instructions, a connection may use a sewn loop, a connector, or another specified attachment method. There is no universal configuration to copy across every setup.
Conceptual connection path, not a setup instruction:
Harness attachment point → lanyard termination → connector or specified interface → trolley attachment point
The diagram shows the relationship between parts, not a prescription for which connector or attachment method to use. Some systems use a different interface or component arrangement. Follow the documentation for the specific harness, lanyard, connector, and trolley, and confirm that the connection points are intended to work together. The lanyard does not replace the trolley, and the trolley does not replace the braking equipment.
Before evaluating a configuration, identify each component and its documented function. This makes it easier to spot a mismatch, such as an attachment method that conflicts with the harness or trolley instructions.
Connection Lanyard vs. Positioning Lanyard
A connection lanyard describes the lanyard’s role in linking the harness to the trolley assembly. A positioning lanyard is intended for positioning within the application stated for that product. The terms can overlap in casual conversation, but they don’t automatically describe the same system role or approved use.
Two lanyards may look similar, even if both use webbing, but that resemblance doesn’t make them interchangeable. Compare the product’s stated intended use, attachment details, and instructions with the needs of the complete zipline system. Fusion Climb’s lanyard range includes adjustable positioning lanyards and other configurations. Distinguish each option by its documented role, not its appearance.
For a broader explanation of related terminology, see the zipline lanyards and tethers guide. Clear terms keep the focus on whether each component is specified for its place in the system.
Which Design Details Shape a Zipline Lanyard Connection?
Material, termination, and adjustment all shape how a lanyard interfaces with the rest of a zipline setup. None is a stand-alone measure of suitability. Compare each detail against the documented application and the harness and trolley connection points, rather than treating one construction type as the default choice.
Rope, Webbing, and Reinforced Stitching
Rope and webbing are different construction categories, and neither is universally better. Fusion Climb’s lanyard collection describes nylon and polyester slings, as well as high-strength webbing, reinforced bar-tack stitching, and abrasion-resistant materials. These details explain how a product is constructed; they don’t, by themselves, establish its dimensions, rating, intended use, or service life.
Read the product documentation closely. For a webbing lanyard, note the stated material and the construction of its sewn terminations. For a rope configuration, look for its specified attachment method and application. Abrasion resistance is relevant to material selection, but it doesn’t mean a lanyard can be used indefinitely or without inspection. The OSHA Standards for Lanyards provide a regulatory reference for safety belts, lifelines, and lanyards within that standard’s scope. They aren’t a substitute for product-specific documentation or system instructions.
Attachment details matter as much as the body material. A sewn loop is an integrated termination intended to connect as specified by its product instructions. A girth hitch attaches a loop around a compatible point. These methods aren’t automatically interchangeable: the attachment point’s design, the lanyard instructions, and the full system determine which interface is appropriate. Connector-based interfaces add another component, so include both the lanyard termination and connector in your compatibility review.
Fixed, Adjustable, and Energy-Absorbing Configurations
A fixed configuration has a set connection length, while an adjustable design allows its length to be changed within the product’s intended configuration. That difference affects how the lanyard fits into a specific setup; it doesn’t make either type suitable for every user or trolley. Compare stated dimensions and the adjustment method with the product listing and manufacturer instructions.
Energy-absorbing lanyards are a distinct design category, not a universal requirement or a general-purpose substitute for another lanyard. Their role must be considered within an application-specific system design, using the documentation for the lanyard and connected components. Don’t infer intended use from appearance or from the word “lanyard” alone.
Connector terminology can help clarify the final interface. A carabiner’s shape and gate design describe its form, but they don’t establish compatibility with a particular lanyard or trolley. The professional climbing carabiner guide covers connector terms that can make product comparisons more precise.
Use these design details as a comparison checklist, then review Fusion Climb’s lanyard and tether configurations alongside the documentation for the complete setup. Match materials, terminations, adjustment, and connector interfaces to the stated application.
How to Compare Zipline Connection Lanyards Before Buying
Compare documented details side by side, not by color, apparent thickness, or a quick visual match. Zipline connection lanyards can share a general shape while differing in material, length, attachment design, adjustment, and intended application. Start with the specifications for the exact lanyard, then check how it fits the harness, connector, and trolley in the planned system.
What to Compare in Product Specifications
Use the product listing and manufacturer instructions as your evidence. Record what they state, and leave assumptions out. Category names such as “webbing” or “adjustable” don’t supply missing dimensions, ratings, or intended-use details. If a specification matters to your setup, it should be supported by applicable product documentation.
| Compare | What to verify |
|---|---|
| Construction | Stated material, such as rope, webbing, or a specified sling material, and any described stitching or reinforcement. |
| Length and adjustment | Documented dimensions and whether the connection length is fixed or adjustable, including any stated adjustment range. |
| Attachment style | How each end is designed to connect, such as a sewn loop or a connector interface, and the instructions for that method. |
| Intended use | Product-specific application, ratings, and other claims as stated in the relevant documentation. |
Length deserves more than a glance at the number on a listing. Consider how the lanyard’s stated length relates to the harness attachment position, the trolley’s geometry, and the system’s documented design. A length that seems convenient on its own may change how connected components align or interact. Don’t infer suitability from another setup that only looks similar.
How Lanyards Fit into a Complete Zipline System
Check each interface as a chain: harness to lanyard, lanyard to connector where specified, and connector to trolley. A matching connector at both ends doesn’t prove the complete combination is compatible. The connection also needs to align with component instructions and the wider equipment plan, including the trolley-side arrangement. ACCT Zipline Safety Standards offer a standards reference for challenge-course and zipline operations. Apply the requirements relevant to the specific system and operating context.
For trolley-side context, the commercial zipline pulley guide explains why pulley design belongs in the comparison rather than treating the lanyard as an isolated purchase. Build your shortlist around documented application, attachment, length, and compatibility. Fusion Climb’s lanyard and tether options provide configurations to compare against those criteria.
How to Select a Zipline Connection Lanyard for Your Application
No single lanyard configuration suits every zipline system. A practical selection starts with the activity and system documentation, then works through the interfaces and product details in sequence. This keeps a familiar-looking design or a convenient length from standing in for documented fit.
A Practical Four-Step Selection Sequence
- Define the activity and system configuration. Identify how the zipline is intended to operate and which components make up the setup. Start with the system documentation, including the equipment plan and any instructions that specify component roles.
- Map the connection points. Identify the harness attachment point and the trolley-side connection. Note how each interface is designed to connect, including any specified connector or attachment method. Don’t assume a connection method transfers from one component combination to another.
- Compare the lanyard details. Review the documented length, material, fixed or adjustable configuration, attachment style, and intended use. For example, an adjustable design and a fixed-length design may address different configuration needs. Compare their stated details rather than treating them as interchangeable.
- Review the complete setup. Check that the lanyard, harness, connectors, trolley, and other relevant equipment align with their manufacturers’ instructions and applicable requirements. Resolve gaps in documentation before treating a configuration as suitable.
This sequence gives you a clear basis for comparing candidates. Keep the relevant product specifications with the system documents so decisions can be traced to stated requirements, not visual similarity or assumptions based on a product category name.
When to Consider Standards and System Documentation
References to ANSI, OSHA, or ASTM International aren’t interchangeable, and a general mention of a standard doesn’t establish that a particular lanyard is certified to it or that the standard applies to your application. Check the scope of any cited standard and look for product-specific documentation that states the relevant rating, certification, or intended use. If the documents don’t establish a required point, don’t fill the gap with inference.
System instructions matter alongside standards references. They help define how components are intended to interface and what configuration the equipment is designed for. Broader equipment context, including the relationship among ropes-course components and hardware, is covered in this ropes course safety equipment guide.
Use the same disciplined comparison when reviewing Fusion Climb’s range: match each lanyard’s documented configuration to the system requirements, then evaluate it alongside related harness, pulley, and connector details. Explore Fusion Climb lanyard and tether options as you narrow your selection.
Explore Fusion Climb Zipline Connection Lanyards
Fusion Climb’s lanyard and tether range includes multiple configurations to evaluate against your application and complete system. Use the collection categories to focus your comparison: whether you need adjustability, a particular attachment configuration, or a design category intended for a specific system role. Then compare product details with the requirements documented for your harness, trolley, and connectors.
Match Collection Categories to Your Comparison Criteria
Start with the feature that matters to your setup. Adjustable positioning lanyards are relevant if your system requirements call for an adjustable configuration. Sewn anchor loops give you a specific termination style to compare with the intended attachment point and component instructions. Neither category is a universal fit; the documented application and interfaces guide the decision.
The collection also describes energy-absorbing lanyards and heavy-duty tethering systems. Treat these as distinct product categories, not interchangeable substitutes for a connection lanyard. An energy-absorbing design belongs in an application-specific system evaluation, while a heavy-duty tethering category should be assessed by its stated intended use and product documentation. Don’t infer capacity or suitability from a category label alone.
Construction details add useful context to that comparison. The collection describes high-strength webbing, reinforced bar-tack stitching, and abrasion-resistant materials, alongside nylon and polyester sling categories. These are stated design and material details, not a guarantee of service life or proof that a product fits a particular setup. Check each product’s specifications for dimensions, ratings, and intended application.
Move from Comparison to a Product Decision
Before narrowing your options, bring the system requirements together. Confirm the harness attachment point and trolley-side interface, then compare each lanyard’s configuration, material, stated length, and attachment style. Review any adjustment features and documented intended use. This gives you a consistent basis for evaluating alternatives and makes gaps in the available specifications easier to spot.
Keep the whole connection in view. A lanyard is one part of an assembly that also includes the harness, connectors, and trolley. Matching connector ends by appearance doesn’t establish overall compatibility. Use the manufacturers’ instructions for the relevant components, and treat ratings or certification statements as product-specific details that need to match the intended application.
Fusion Climb’s lanyard and tether options provide a range to compare, from adjustable designs and sewn loops to energy-absorbing configurations. Select by documented fit and system role, not by category name alone. When the relevant specifications align with your system requirements, you can make a more informed product decision. Explore Fusion Climb lanyards and slings.
Make Your Next Connection a Deliberate Choice
Before choosing, turn your system requirements into a short reference: the intended application, the interfaces each component must support, and the product details that need to align. Keep that record with your equipment documentation. It can make future reviews and replacement decisions more consistent, especially when a setup changes or components are updated.
Use the same disciplined approach as you explore Fusion Climb’s specialized zipline and climbing safety gear. Its lanyard collection brings together different configurations and construction details, including reinforced bar-tack stitching and abrasion-resistant materials. Treat each detail as a point for comparison, then match product-specific instructions to the needs of your complete system. The goal isn’t to choose the most complex option. It’s to select a documented configuration that fits its intended role.
Make your next product comparison with the system requirements in front of you. Explore Fusion Climb lanyards and slings and compare the options with your documented connection needs.
Frequently Asked Questions
What is a zipline connection lanyard?
A zipline connection lanyard links a user’s harness to a zipline trolley assembly. The precise path may include connectors or other specified interfaces, depending on equipment design and instructions. The lanyard is not the harness, which supports the user, or the trolley, which interfaces with the zipline. Treat it as one component in the system, not proof that a setup is suitable on its own.
How long should a zipline connection lanyard be?
There’s no universal length that fits every setup. The required length depends on system geometry, harness attachment position, connection points, and the product requirements documented by the manufacturers. A lanyard’s stated length must make sense with the trolley arrangement and harness interface in the system design. Compare the product’s listed dimensions with the complete setup instructions rather than borrowing a measurement from a different product or installation.
Can any lanyard connect a harness to a zipline trolley?
No. A lanyard that looks similar or has a connector that appears to fit isn’t automatically suitable. Consider the lanyard’s intended use and attachment, the harness connection point, each connector, and the trolley as parts of one system. A connector fitting through an attachment point doesn’t establish that the lanyard configuration is intended for that application. Use product instructions to assess compatibility; no single connection style applies universally.
What is the difference between a fixed and adjustable zipline lanyard?
A fixed lanyard has a set connection length, while an adjustable lanyard allows its length to be changed as specified for that product. That distinction can affect how a lanyard fits the documented system configuration, but convenience alone isn’t a sound basis for choosing. Review the product’s instructions and stated application. Fixed and adjustable designs aren’t automatically interchangeable, and neither configuration is inherently safer in every system.
Do zipline connection lanyards need an energy absorber?
Not automatically. An energy-absorbing lanyard is a distinct design category, and whether it belongs in a setup depends on the system design, intended application, and product documentation. Don’t add one based only on its name or assume it can replace another lanyard type. Review the relevant system and manufacturer guidance to determine the specified configuration. The presence of an energy absorber alone doesn’t establish that the complete setup is suitable.
How do you connect a zipline lanyard to a harness and trolley?
The general connection path runs from the harness attachment point through the lanyard and any specified connector to the trolley interface. The exact attachment method varies with component design, so this is not a universal rigging procedure. One product may specify a sewn loop while another uses a connector interface. Follow the instructions for the exact components and complete system design to determine the correct configuration.
What should I check before buying a zipline connection lanyard?
Check the intended application, stated length, construction, adjustment features, attachment style, and product documentation. Then assess how the lanyard interfaces with the harness, connectors, and trolley together. A listing may describe webbing and an adjustable configuration, but those labels alone don’t establish dimensions or suitability for your setup. Use product-specific instructions for ratings and intended use, and don’t rely on appearance or one feature as proof of fit.